the 210 gallon in wall project

ok, well, if yours was a MH, then i think i'll be ok, but i'll make sure to take some temp readings when i do the first power up...

so far things are going well, i am fighting a small microbubble problem, but thats just gonna take some time, cause i've already eliminated the skimmer, so..... must be turbulance related...
 
check you pumps they may be sucking in air. my external pump was making a vortex in the water and it would suck in a bunch of air
 
both my pumps are submerged in a 17 gallon bucket thats 3/4 full... good idea, but not applicable on my particular situation :mrgreen:
 
well, more done on the lights, the steel frame is all done, the lifting arms are done and painted, the "skin" 1/4" plywood is cut and painted.. waiting for that to dry now... also got all 32 bulb holders installed...

its starting to take shape... i expect that i'll get it skinned, and the sliders installed today... maybe even the main fixture, but i'm not sure about that yet... then there is all the wiring...

one thing that i was considering was how to wire this thing up... meaning which bulb positions would be wired together so that they come on together... the easiest way to do it would be just split the fixture up into 4 corners, and each corner gets a ballast.. but thats gonna look kinda weird as the come on progressively... the other thing is that i dont have 4 of the same ballasts, i have 3 ballasts that will run 4 bulbs each, and then i have 2 more ballasts that will run 2 bulbs each...

so, whaddya'll think? the basic layout is 2 slightly overlapping colums with 8 rows each...
 

Attachments

  • photo of light fixture with bulb holders installed.jpg
    photo of light fixture with bulb holders installed.jpg
    26.4 KB · Views: 180
Last edited:
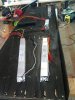
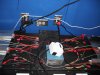
oh, and while i'm waiting for someone to make a suggestion on how to wire the fixture up, i went scrounging upstairs in the shop and i found some stuff that i think will be handy... i found 6 12v fans, and then i went scrounging around in my parts bin, and i threw together a basic mosfet temp controller for the fans, as the temp goes up, the fan speed goes up... its adjustable so you can pick the setpoint where the fans come on at... i'm touching the thermistor, (the temp sensor) with my finger and jus the heat of my finger makes the fans react...
[ame="http://www.youtube.com/watch?v=OGGLuPdYVb8"]http://www.youtube.com/watch?v=OGGLuPdYVb8[/ame]

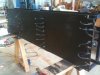
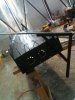
also got the fixture skinned, i ended up using some aluminimum flashing material that i found at the home depot, 10 feet long, 10 inches wide, 2 rolls made the perfect reflector for the fixture. Perhaps not as shiney as some of my other choices, but definately more durable and easier to work with than some.... and from past projects, i know that i can cut this alum. with my B&D power siscors....
[ame="http://www.youtube.com/watch?v=OGGLuPdYVb8"][/ame]
[ame="http://www.youtube.com/watch?v=GYA2qyidI38"]http://www.youtube.com/watch?v=GYA2qyidI38[/ame]

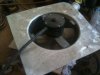
also found a shrouded 110 fan upstairs... i was thinking that i could take the motor out of this and just use the shround ontop of the light fixture to let the hot air out... hmmm
[ame="http://www.youtube.com/watch?v=GYA2qyidI38"][/ame]
 

Attachments

  • photo1 shrouded fan....jpg
    photo1 shrouded fan....jpg
    32.5 KB · Views: 165
  • photo1 top of fixture with wires sticking through.jpg
    photo1 top of fixture with wires sticking through.jpg
    40.4 KB · Views: 175
  • photo2 fixture skinned.jpg
    photo2 fixture skinned.jpg
    36.5 KB · Views: 171
  • photo of light fixture with bulb holders installed.jpg
    photo of light fixture with bulb holders installed.jpg
    26.4 KB · Views: 179
Last edited:
alrighty... got the drawer sliders mounted, and the pivot and support arms are in and working...
[ame=http://www.youtube.com/watch?v=EquRO0fb9jE]YouTube - Light fixture tour[/ame]

now... ballasts, and which bulb positions to wire together...
 

Attachments

  • balasts laying around.jpg
    balasts laying around.jpg
    30.9 KB · Views: 178
  • slider and pivot demo.jpg
    slider and pivot demo.jpg
    28.4 KB · Views: 171
WOW! Awesome stuff! I wish I was able to make anything let alone anything for my tank!

When you think of it can you take a pic of the tank with the green fabric on it? I would love to see what it looks like! I think it is something I might do for my 29gal, because it seems that it would be easy to install and put on a tank that is already in place and in somewhat in the corner!
 
gladly, but i'll wait till i get the new good lights on it so you can really see it... cause right now all i have on the tank is some "shop lights" just to give the fish a feeling of day and night... its really not the right color or intensity... but help me remember(please ask me again cause i'm likely to forget) and i'd be glad to take pics of it up close so you can see it...
 
Yea you and me both! Hehehe.

Well I got just a tad closer to getting the lights ready. I got the eyebolts and counterweight ropes configured. I may go out to the shop a lil later and finish up the wiring and mounting the ballasts. And then all there is is to install the bulbs and fire it up.
 
well, i hope i'm headed in the right direction, i'm just waiting till i can get some help so i can install the lights... but everyone has thoes things called jobs.. so, i have to wait...
 
oh, did i evern mention that i found a defect in the front glass of my tank? about 1/3 of the way from the left, about 1/3 down, there is a bubble in the glass, ive ran the magfloat over it, and its most definately sealed inside the glass... just a tiny bubble... you cant even see it unless you know where to look...

hope it dosent show up real bad once i get the new lights installed...
 
ok, so who ordered the tanning bed? got the last of the electrics for the lights done, got the ballasts mounted on some of the same alum sheet as i'm using for reflector to act as a heatsink for the ballasts...

also, didnt have another tech-killer handy, so i ended up wiring the 2-2bulb ballasts together, so i have 4 light zones...

i'm gonna run a temp test tomorrow after i get done with the honney-do stuff...

then its mounting it on the wall above the tank and seeing what it looks like...
 

Attachments

  • did someone order a tanning bed.jpg
    did someone order a tanning bed.jpg
    20.5 KB · Views: 208
TAAADAAA!!!! its just sitting on the tank on little rubber feets for tonight, but tomorrow, i'll spend time re-working the SCWD and the snoozels and the mounting brackets for the light fixture, then i'll weigh out the counterweight, and test that...

everybody is hiding right now... all the noise of moving that thing in, and then sitting it on the tank, and then the new brighter than the sun lights... hehehe

oh, and i can finally take pictures in the tank without the flash!!!

now i just gotta play with the timing, and maybe move a couple bulbs around in the fisture....
 

Attachments

  • 4-2-10 050  s.jpg
    4-2-10 050 s.jpg
    39.3 KB · Views: 232
  • 4-2-10 053  s.jpg
    4-2-10 053 s.jpg
    61.9 KB · Views: 241
  • 4-2-10 054  s.jpg
    4-2-10 054 s.jpg
    44.6 KB · Views: 239
  • 4-2-10 055  s.jpg
    4-2-10 055 s.jpg
    51.5 KB · Views: 213
  • 4-2-10 056  s.jpg
    4-2-10 056 s.jpg
    57.7 KB · Views: 233
Back
Top