Rcpilot - 29g Frag Tank

you should be find because the water level will ba almost at the top of those teeth while it is draining. if you look at my overflow on my 75 the water is tbout 1/2in above the bottom of the teeth ant it keeps the water above the trim on the tank but not by much.
 
On the overflow that I have in my closet not being used, the gasket for the bulkhead is on the inside. It came from the factory that way so I am assuming it is right.

Pics look good. Hope you sell lots of frags:Cheers:
 
Plumbing shots.

Just mocking up a few pieces. Need to cut a hole for the return line. You can see the outline for the hole in the last pic. It's 2:30 in the morning though. I don't think my neighbors want to hear a sawzall right now.

How tight do I need the bulk head? Of course, the obvious answer is - until it don't leak. Anybody got experience with these?

Home Depot sucks. They don't have clear PVC primer. All they had is the purple stuff and I hate that crap. So I'm making sure I only prime about 1" on the outside of each piece of pipe, that way you can't see ugly drips all over the place. I can prime the inside of all the fittings 100%. You don't see insdie the fittings after they are glued. So far I've been lucky and only got a splotch of purple on a few places. Trying to make it look neat. I know it's just a frag tank, but I can't help myself.
 

Attachments

  • IMG_3120.JPG
    IMG_3120.JPG
    41.7 KB · Views: 329
  • IMG_3122.JPG
    IMG_3122.JPG
    37.4 KB · Views: 268
  • IMG_3123.JPG
    IMG_3123.JPG
    42.4 KB · Views: 241
  • IMG_3124.JPG
    IMG_3124.JPG
    35.4 KB · Views: 248
  • IMG_3126.JPG
    IMG_3126.JPG
    41.2 KB · Views: 272
Last edited:
Progress:
 

Attachments

  • IMG_3132.JPG
    IMG_3132.JPG
    43.4 KB · Views: 269
  • IMG_3131.JPG
    IMG_3131.JPG
    42.1 KB · Views: 248
  • IMG_3130.JPG
    IMG_3130.JPG
    35.6 KB · Views: 290
  • IMG_3129.JPG
    IMG_3129.JPG
    35.9 KB · Views: 266
  • IMG_3128.JPG
    IMG_3128.JPG
    44 KB · Views: 255
More progress:
 

Attachments

  • IMG_3137.JPG
    IMG_3137.JPG
    41.6 KB · Views: 272
  • IMG_3136.JPG
    IMG_3136.JPG
    49.2 KB · Views: 253
  • IMG_3135.JPG
    IMG_3135.JPG
    40.4 KB · Views: 245
  • IMG_3134.JPG
    IMG_3134.JPG
    42.1 KB · Views: 280
  • IMG_3133.JPG
    IMG_3133.JPG
    39.7 KB · Views: 260
Video of me using the hole saw to smooth out the edges of the glass:


Baffles goin' in the 20L:
 

Attachments

  • IMG_3140.JPG
    IMG_3140.JPG
    40.3 KB · Views: 300
  • IMG_3145.JPG
    IMG_3145.JPG
    50.4 KB · Views: 315
Last edited:
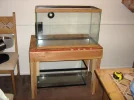
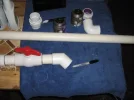
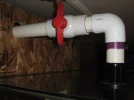
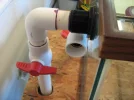
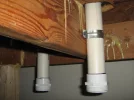
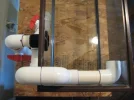
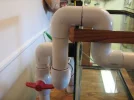
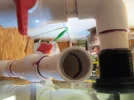
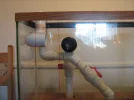
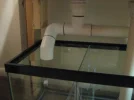
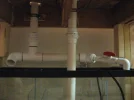
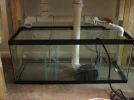
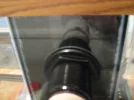
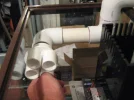
Alright, so I'm a little stuck right now. I put the baffles in the 20L, but have to wait for the silicone to dry overnight. Can't do much more plumbing until the sump is under the stand.

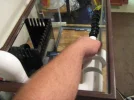
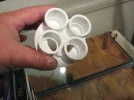
Had a small emergency in the 10g frag tank. I cut up some mushrooms last week and stuck them in a tupperware container with a lid and some rock rubble. I cut a few 3/8W x 3L slits in the top of the container, hoping they would get very low flow through the slits in the top. Well, apparently that weren't enough, because I was sitting here making that last post and I glanced over at the frag tank. The bottom 1/2 of the tupperware container looked like cloudy mushroom soup.

I jumped up and moved the light off the tank. Reached in and carefully picked up the tupperware container to remove it from the tank. My finger slipped and I dumped 1/2 the water into the tank. :frustrat:

Had to hurry and drop that container in the kitchen sink - it stunk like an outhouse full of pig sh*t. Run and grab the siphon, drain out 3g of water, and refill with NSW from my mixing bucket. Good thing I didn't do my water changes yet today, or I'd have been outta NSW for a few hours. :shock:

I think I averted disaster, but I may do some testing for ammonia, nitrites and nitrates in the next few hours and tomorrow morning before work.
 
Last edited:
And all this time I thought you was a sheetmetal man Rc:D Thats some good looking plumbing work.
Glad you caught the mushroom soup too,that could have been bad.
 
i'm currious about a couple things, and understand i'm not saying anything your doing is wrong, in any way, i just dont understand...

the overflow plumbing i understand, water goes through the bulkhead, and down to the sump, but why all the elaborate up and over and around with the return side of the plumbing? why not just come straight up and over and into the tank?

the other thing i'm currious about is how close together the baffels are in the sump. I did mine at 2 inches apart, and i'm still not happy with my microbubble control, yours look to be much closer together than that, wont that cause more bubbles to make it through the baffels?
 
Thank you Yote. I'm just anal. :frustrat: I can't help myself.

Project5K:
Good questions on the bubbles. I honestly don't know and thought it didn't matter. As you can see from the pics, I just stacked a bunch of books and VHS tapes up in there. Then I slapped the silicone in there and walked off for a few hours until it skinned over enough to move it. Perhaps I didn't think this through enough? Now ya got me nervous........

but why all the elaborate up and over and around with the return side of the plumbing? why not just come straight up and over and into the tank?
Because the right side of the tank is where the frag racks are going. I don't want my real estate on the right side of the tank being sacrificed due to plumbing.

The tank is 30" long. The PC 65w lights are 24" long - or 22" long, but the overall fixture is 24" long.

The MH 175w bulb is like 10" long. So it's centered 12" from the right side and it's setting from back to front. Each PC light runs behind or in front of the MH fixture along the front and back rails.

See attached pic for a Top-Down view of the tank and sump. The top part of the pic is the 29g frag tank. The bottom part is the 20L sump underneath it. But these are viewing from the top looking down. NOT side views.

29gTopDown.jpg
 
Last edited:
More pics of the plumbing. I am probably done until after it's filled up.

The left side is the skimmer compartment. I might need to add a short length of pipe to that last 45* in order to reduce splashing.

The right side is the refugium. I'm probably going to cut a piece of egg crate and silicone it on top of the 10" baffle to keep macro algae contained.

My sump looks awful small now. :grumble:
 

Attachments

  • IMG_3161.JPG
    IMG_3161.JPG
    35.9 KB · Views: 335
  • IMG_3160.JPG
    IMG_3160.JPG
    37.8 KB · Views: 233
  • IMG_3159.JPG
    IMG_3159.JPG
    46.8 KB · Views: 261
  • IMG_3150.JPG
    IMG_3150.JPG
    35.5 KB · Views: 249
  • IMG_3149.JPG
    IMG_3149.JPG
    46.3 KB · Views: 227
Last pic of the plumbing until this sucker is full of water.

I need to get a strap on the 3/4" line over on the right side. It's not all that heavy, but it's a lot of leverage out there pulling on my 1.5" union. Just need to take a little strain off it.
 

Attachments

  • IMG_3162.jpg
    IMG_3162.jpg
    18.4 KB · Views: 420
Really? Thanks Mr. Sniffles. :Cheers:

Wasn't all that hard. Just a little planing and a whole lotta redneck engineering. I like to use a proven scientific principal for all DIY projects. It's the old tried and true:
"Thats 'bout right" method. :lol:
 
I might do this inside the tank. I'm not sure yet. These loc-line parts are so expensive, I am tempted to return them. Just let the return line blow wild right out of that last 90*.

Maybe put the SPS frags right there in front of the 90* on the top rack closest to the lights? :Cheers:

The last pic is my bulk head strainer. I bought a threaded/slip bulkhead so I could thread this strainer into the front. There is just enough room inside the overflow box to screw the strainer on and off for maintenance and cleaning.
 

Attachments

  • IMG_3164.JPG
    IMG_3164.JPG
    49.9 KB · Views: 285
  • IMG_3165.JPG
    IMG_3165.JPG
    45.9 KB · Views: 270
  • IMG_3167.JPG
    IMG_3167.JPG
    44 KB · Views: 244
  • IMG_3166.JPG
    IMG_3166.JPG
    42.6 KB · Views: 250
  • IMG_3163.JPG
    IMG_3163.JPG
    42.8 KB · Views: 291
Back
Top