Tanked's 125 build thread

30 long, got it, i have one that i was thinking about using till i realized it leaked...

well you sure could go with a hob skimmer, but i've tried it, and from what i have experienced, its safer to go with an insump unit... just incase it overflows or whatever, the water dosent land on the floor, it just drops into the sump and you dont end up running the return pump dry...

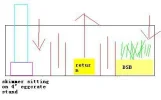
so, if you use the dimentions of the skimmer i have, (octo110) its like a 10x6 footprint, but really shouldnt be in a space smaller than 11x7, lets use that, so 7 inches, then i'd space the tripple baffels out to like 2.5 inches apart at least, so thats 12 so far, plus glass thickness (id go 1/4 inch) then comming from the other end, the fuge could be, say, 10 inches, then another set of tripple baffels, but these can be closer to save space cause the flow in the fuge will be less, so, say space thoes out at 2" each, so thats 14, so 14 and 12 is 26, and 36-26 is 10, thats a decent return section... and this is also where your ATO would go...

i'll work on a basic paint drawing after i hit post...

ok, so, i would have each of the drains going seperately to the sump... one into the skimmer and the other into the fuge, and i guess that they are the same size, so if you wanted to push a little more water towards the skimmer, you could t off the fuge drain line and push some of that over to the skimmer side..
 

Attachments

  • 30long sump with fuge.webp
    30long sump with fuge.webp
    8.2 KB · Views: 258
Last edited:
neat idea! thanks Project. I do like the idea of a drain directly to the fuge, and i think T-ing it off is a good idea.. I need to grow pods there, and they don't like high flow. why put the skimmer up on an eggcrate stand? and does your octo skimmer work well?

also, looking at the way my LFS has their sumps set up, all the pumps are external to the sump (in line)... my pump can go either way. The LFS said that keeping the pump outside the sump reduces water temp a bit, and with these MH lamps that could be a problem for me some day... so should I drill the sump to be an in-line, or go with the in sump pump?
 
In the sump is easier and cheaper. You'll just have to decide if you want to make it easy on yourself and take the risk of the water being hot - or do it the hard way by plumbing the return pump outside the water - but having the knowledge that if the water is hot, it's NOT the pump because it's outside the water.

Personally, I'd leave the pump in the water and take the risk. It's easy to drop 2F or 4F with a fan.

Might not even get hot if you make your canopy with ventilation fans and small vents to allow for air exchange inside the canopy. You can run a whole lotta computer fans with a small computer power supply. Set it on a timer with your lights. Or get fancy and put it on a controller set to turn on when the temp in the hood exceeds 100F.

Remember, heat rises, so fans mounted on top and pulling heat out the top of a canopy is a good thing. At the very least, you could use passive air flow through the top by installing small vents or louvers to allow hot air a passage way out the top instead of just collecting.

Intake fans on the left side - exhaust fans on the right side. Pull in fresh air from outside the canopy and suck it across the lights. Blow it out the other side.
 
Last edited:
yea, well, like rc said, drilling will remove some of the heat, but how big of a pump are you talking about using? cause for that 125 you'd be looking at like 1250gph to the sump, thats less than 100W worth of pump, i really dont thinK that an in sump pump is gonna be a major heat contributor, not to mention that for something like this, when considering drilling your 30L vs adding a couple fans, i'd go with the fans, they take up less room, will help protect you from going over temp from all sources of heat, and not just the pump, and theres that many less connections to leak...

as for my skimmer, i suggested putting the skimmer up on the eggcrate table cause the skimmer i have wants to be sitting in 8 inches of water, and the baffels are 12 inches tall, so theres 12 inches of water, the table is 4 inches, and tadaa...
oh yea, now that my skimmer has kinda broken in a bit, and i've stopped changing things in my sump every other day, yes its working wonderfully. cant hear it at all over my overflow noise, and its putting out some dark nasty stuff....
 
Last edited:
With your 9.5 pump,there wont be enough heat transfer to even notice.
Plus,I'm thinking like Project,hang a couple of fans above the tank.That way there are no worries about high temps.
 
Ok, you're all right. I won't drill. So two other questions: 1) with a union, do I glue anything or just use tape? And 2) is 1.25" big enough to handle this?

Got all my plumbing pieces last night. Sump should be in today so - hope to get the baffles cut today and silicone it together tonight, maybe.
 
In the sump is easier and cheaper. You'll just have to decide if you want to make it easy on yourself and take the risk of the water being hot - or do it the hard way by plumbing the return pump outside the water - but having the knowledge that if the water is hot, it's NOT the pump because it's outside the water.

Personally, I'd leave the pump in the water and take the risk. It's easy to drop 2F or 4F with a fan.

Might not even get hot if you make your canopy with ventilation fans and small vents to allow for air exchange inside the canopy. You can run a whole lotta computer fans with a small computer power supply. Set it on a timer with your lights. Or get fancy and put it on a controller set to turn on when the temp in the hood exceeds 100F.

Remember, heat rises, so fans mounted on top and pulling heat out the top of a canopy is a good thing. At the very least, you could use passive air flow through the top by installing small vents or louvers to allow hot air a passage way out the top instead of just collecting.

Intake fans on the left side - exhaust fans on the right side. Pull in fresh air from outside the canopy and suck it across the lights. Blow it out the other side.

Ok, so I wasn't planning on making a canopy, really. The tank has a glass cover, which I haven't decided to use or not-- will depend how hot the tank runs vs how fast water evaporates without it...
Hmm. Now I'm re-evaluating that glass cover thing.
 
pvc unions are generally available in either a slip fit(glue) or a threaded version... you can get which ever fits your needs better. If you look at the plumbing that i did on the back of my tank, i went with the threaded ones, and then used threaded adapters to glue onto the pipe, and then teflon tape and thread into the union.. that way if i ever decide to re-do my stuff, i can save and re-use the unions cause they are expensive...

you're using a 125 tank, so 125 * 10x = 1250gph flow...
1.25 inch pvc will flow about 1500 gph, and you have 2 of them, so i would say your headed towards a good reliable and safe system....

you can put the fans blowing on the sump, that will help evap water and pull out heat just like it would on the DT... a buddy of mine has a $8 walmart box fan blowing across his sump... works just fine....
 
Last edited:
yea, an ato is a wonderfull thing.. mine cost me about $40 total to make, and works like a champ! mine comes on 6 times a day for 2 min each.... i tried 1 min but i thought it wasnt quite keeping up... so i bumped up my times...
 
I thought about an ato, but I don't have a tap water source near my tank to coNnect to the DI line....

How tall should I make my sump baffles? I got the 30 long today, and am going to get the panels cut after dinner...
 
Most skimmers will need between 8 - 10 inches of water to operate. So your first skimmer baffle needs to be about that tall.

The second baffle just needs to be an inch or two higher than the top of that first baffle. But you don't want it to run all the way to the bottom of the tank. Stop that one about 1.5" or 2" before the bottom. The third baffle is the height of your sump. It's got to be lower than the first skimmer baffle, so cut that one at least 1/2" shorted than the first one.

Project5k mentioned in my 29g frag build that I should have placed my baffles farther apart. I just slapped a few random books and VHS tapes in between the baffles and glued them all in at once. I ended up with baffle spacing around one inch. If I had been using my head, I'd have spread the baffles out to 1.5" or even 2" apart. That slows down the water velocity through the baffles. With slower moving water, air bubbles will have an easier time getting out. Fast moving water can entrap bubbles and actually carry them through the baffles.

On the refugium side, I'd make it as deep as you can go. Cut it to 1.5" below the top of the tank. That way you can fill it up with a DSB, live rock and plenty of cheato. That will be a pod haven. You can make the refugium as wide as you want. Just remember that the wider the refugium, the shorter the actual sump area. You want the sump as big as you can get it, so water evaporation doesn't have as bad an effect.

If your tank is 36" long, I'd put my first 10" baffle about 12" from the end. Now space the next 2 baffles out 1.5" apart. That puts you at 15" from the end of the tank. You got 21" left.

Cut a refugium baffle thats 1.5" below the top of the tank and set it 10" from the end. That leaves you with 11 inches wide on the sump. That should give you about 4.3g in the sump. The sump ends up 12" wide x 11" long and 7.5" tall.
 
Last edited:
The two types of silicone you can find in hardware stores are identified as Silicone I and Silicone II. Silicone II has the anti-microbial additives, so stay away from it.
 
So... After a day's work, all I've learned is that I oughta stay in the lab and out of the garage/shop. Here is my attempt at putting in baffles... I warn you: it ain't pretty! But functional, I hope

<a href="http://s574.photobucket.com/albums/ss181/tankedchemist/?action=view&current=utf-8Bc3VtcDIuanBn.jpg" target="_blank"><img src="http://i574.photobucket.com/albums/ss181/tankedchemist/utf-8Bc3VtcDIuanBn.jpg" border="0" alt="Photobucket"></a>

Tomorrow is the leak test... Cross your fingers!
 
Back
Top