My First Aquarium and DIY Skimmer

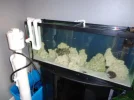
I think I have reached the point where I can start a thread about my tank progress. here is the information about my aqaurium project:
  • 50 gallon
  • Sand Bottom
  • 50 lbs Fiji rock - some live some base
  • 2 750 gph fans - one on each side of the tank
  • DIY PVC siphon overflow - 1" PVC
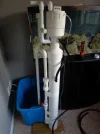
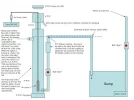
  • DIY PVC Protein Skimmer - Counter Current - 4" Diameter, reduced to 2" and back to 4"
  • 18 gallon container for temporary sump
  • 1 return pump from sump to main tank
  • Stilling working on a lighting system
I think that covers everything. i am currently mid-cycle. My water readings, which I take every other day are this right now:
  • It was started with 2 grocery store shrimps and alot of patiance:frustrat:
  • No Living creatures to my knowledge are in the water!!!
  • PH = 7.8
  • Ammonia = 0 ppm
  • Nitrite = 5.0+ ppm
  • Nitrate = 10-20 ppm
  • SG = 1.030
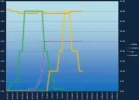
  • I have attached a history of all my readings since I started taking them when the cycle started
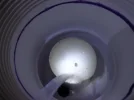
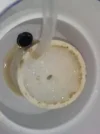
I have started getting a small algae bloom in the tank, but the water is crystal clear still. I jsut finised the skimmer tonight after recieving my Tetra Deep Water pump. I am using a store bought airstone right now and it is really working well, I think:) I have attached a picture of what it starting producing after just 1 hour! Once I got the water level jsut right using the adjustable drain pipe I built, it seems to be running pretty good.

My plans for this tank are not set in stone. I do want fish of course and I would liek to persue coral in the future when I get better. This is the first time I have done any of this nd I started about 2 months ago when I bought a Green Spotted Puffer and then realized fish keeping is a whole worl in it;s self. I am HOOKED! My son wants a clown fish of course. He calls them Nemo fish:) He's 3 by the way and loves the fish tank, asking me everyday if we can get him a Nemo fish. I tell him we have tow ait for nature to run it's course so the fish will be safe.

Anyways, I am going to let the system run over night for the first time and see if things are going well in the morning. I'll be back soon to update as things change or maybe if they don't. As you can tell, I can get a little wordy:)
 

Attachments

  • DSC00124.webp
    DSC00124.webp
    16.5 KB · Views: 1,606
  • DSC00132.webp
    DSC00132.webp
    11.2 KB · Views: 685
  • DSC00134.webp
    DSC00134.webp
    26 KB · Views: 873
  • Capture.webp
    Capture.webp
    18.3 KB · Views: 898
Last edited:
Well, last night I had to turn the sump return pump off. The bubbles in my skimmer were growing way to fast and I was afraid it would overflow the top. So, this morning I dropped the water level in the skimmer in order to give them more time to build up. It's running again right now. By the way, the DIY siphon overflow started right up without priming.
 
Last edited:
You are off to a great start!!!!
Thank you!! I am very excited about this project. Thnak you for all you help in the last month. Your experience and knowledge has saved me alot of time and money and prevented me from doing things COMPLETLY wrong. :bowdown:
 
Ok everyone, I was out of the house today from 12PM to 5PM and I left the system running with the skimmer, overflow, and sump return pump for the first time without anyone watching it. I came home found the floor was still dry:bounce: and everything was running like I left it. I check the skimmer collection area and this is what I found (attached). Looks like it's working. Right now there isn't anything in the water other than rock and sand and algae.
 

Attachments

  • WP_000415.webp
    WP_000415.webp
    7.3 KB · Views: 1,029
LOVE the DIY skimmer, how much did that cost to build if you don't mind my asking? One thing I noticed though is that the stand for your tank doesn't look like it is made for that size tank. Looks like it is for a 36 gallon bow front maybe? Are the edges of your tank supported at all? In the picture it looks like both sides hang off a good 6" or so. If that is the case that is a disaster waiting to happen.
 
The skimmer, including the pump cost about 75$ for the materials used. I of course bought alot more becuse this is the first time I have every done anything like this. I wanted something that would be "over kill" for a skimmer.

About the tank and the stand: It did concern me. I was affraid at first that it would not be stand or would crack the glass or something but here is the story.
I recieved the tank and stand from my dad who had a freshwater system in it. He started with a bowed tank but it was a faulty tank and would not hold water. He purchased this tank and used the same stand. He ran a frash water system in it for over 5 years with the small stand.Today, the stand and tank are very stable and will not fall over or anything. I guess the only risk is the glass breaking.but like I said, he ran it for years with no problem. I am planning how to replace it in the future though. it's gonna take some engineering.
 
I would address the tank stand issue immediately. There is about a150-200 pound difference in a 36 to 40 gallon tank (which is what that stand looks like it was designed for) and a 50 gallon tank like you have. Just because something works for 5 years does not mean it is safe. That set up will eventually fail. There is way too much overhang on either side for that to be safe. Aquariums need to be supported on all 4 sides. With the way you have it now the right and left sides of the tank are unsupported and therefore under increased stress due to pressure. Aquarium sealant can fail because of this and sides can blow out. Hundreds of dollars of livestock and equipment could be destroyed. A child playing next to the tank when this happens could easily be crushed and killed or seriously injured. I wouldn't be able to sleep soundly at night knowing that puny thing was holding up 50 gallons of water and hundreds of dollars of my fish and coral. That is just my 2 cents though.
 
Last edited:
Well, its two cents worth a thousand dollars. You e got me thinking now. Right now is when I need to fix it before it's hard to drain the tank. I have a oak dresser that can hold lots of weight that I may use. I am glad you said something about it. Will draining the water into containers hurt the bacteria I am building right now in the cycle process?
 
I'm not sure exactly how it will affect your cycle but I think you will be fine there. Like you said, draining the tank now will be much easier than doing it later. You want whatever you put your tank on to be able to safely hold the weight, support the tank on all 4 sides without the tank overhanging the stand, and you want the tank and stand to sit level. When the tank overhangs the stand it puts stress on the glass because of the pressure of the water. This is why larger aquariums have braces that run across the tank. The water pressure can actually bow the glass and flex the seals.
 
Justin is right. The tank has to have a stand that fits. One that is much larger than the stand is asking for trouble.
 
No problem, it is what everyone is here for. Glad I could help. I look forward to seeing your tank progress. :)
 
Ok, after thinking for a while about the stand, I am going to build additional support under the parts over hanging. Basically add to my current stand while beefing up current stand.
 
Last edited:
WOW! Since adding the DIY skimmer to the system, it has performed great! At first the bubbles were thick, brown, and foamy and now they are a cleaner white color. Is it possible that the gunk that was washed out was all that was in the water? During the first day, the simmer collected some nice yellow and brown colored junk, but now it's just producing some yellow water. Maybe my system is just not that dirty right now since there is no fish and I am in the middle of the cycle?
Tonight I am going to be painting the new support for the display tank. I am altering a solid wood dresser that I have to be the replacement stand. Thanks to everyone who encouraged me to be get the main tank supported correctly. I'll post some pics of the modification to the dresser I am doing to night when I get home from work.

Speaking of work, I better get back to it:):)

P.S. One last thought. Since adding the skimmer to the system on Saturday, I am reading near 0 ppm nitrates in the system. Should be the happening while the nitrites are still 5.00 ppm or higher? I was reading 10-20ppm before adding the skimmer.
 
Last edited:
That PS looks great! Did you find the plans somewhere or did you design it yourself? I'm currently researching DIY skimmers for my 75g. If you have plans/instructions could you let me know where to get them? Thanks!
 
That PS looks great! Did you find the plans somewhere or did you design it yourself? I'm currently researching DIY skimmers for my 75g. If you have plans/instructions could you let me know where to get them? Thanks!

Thanks! It was a lot of fun designing and building the skimmer. I got a lot of help and input from this message board and GOOGLE! :) I really didn't follow a design as much as I studied the concept of the skimmer I was waning to build. I am NO EXPERT, but from what I learned from building the one I did, here is some points:

  • DO NOT RUSH! :)
  • Study all the types of skimmer designs on the internet. I settle down on two type as possible designs:
    • Counter Current with air stones
    • Needle Wheel with a Venturi
  • Study both of these and select the one you like the most. Both are well thought out designs and concepts. The science behind both is amazing when understood.
  • When you decide, STAY with that design. I found my self ALMOST buying stuff and changing my mind and back and forth. :frustrat:
  • I decided on the Counter Current with air stones merely because it is the cheapest. Both options were pretty good.
  • Don't run to Lowes and buy a bunch of stuff like I did. I bought enough material to build two of these things:frustrat:...lol, it was fun though. Wait until you design your skimmer and then go buy stuff.
  • When you settle on a design, STUDY, STUDY, and STUDY some more. Know what is happening in the skimmer before building it and adding water.
  • Finally when you build the skimmer, test it on a separate body of water and then test it on the front of the aquarium, before placing it in it's final location. My biggest challenge was getting the flow rates to be balanced. You can practice this on your test water and the aquarium before making it fixed.
I built the skimmer by looking at pictures of skimmers on Google. I am attaching a picture of the design I created. I made this PowerPoint in order to have a guide while building. I have indicated some critical measurements and points of interest in the system. If you have any other questions, I'll try to help:) Like I said, I'm pretty new to this.
 

Attachments

  • Skimmer.webp
    Skimmer.webp
    28.1 KB · Views: 3,974
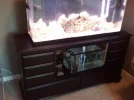
I have updated the stand for the aquarium. I took a ALL WOOD dresser which was solid a rock and cut out the center shelving. I made this my sump area. I then painted the stand black and and moved my system onto it. What do you all think? I am getting some silver knobs for the drawers tonight. All my supplies and equipment fit in the draws and my skimmer and piping fits behind the dresser, out of sight:bounce:

Also, I forgot, but I'll be adding a set of doors to the front of the stand in order to cover the sump.
 

Attachments

  • WP_000420.webp
    WP_000420.webp
    26.1 KB · Views: 1,414
Last edited:
Back
Top