mng777777
Shark Wrangler Wannabe
Well this is my first saltwater build and I am happy to report that it is going extremely well! I didn't find this site or the inspiration to start taking pictures until after the tank was already full of water. I wish that were not the case as I would have done a couple of things differently based on what I have learned. I have fixed the major concerns without tearing anything down and now being several months into it, I don't plan to start over. Here is my progress so far.
I started with a 75 gal drilled acrylic tank and stand/canopy that I wrestled away from a freshwater guy here in town. He was moving and needed it gone. I told him I was going to build a salt reef and he replied this tank will never work for that....
I got the tank and stand home, salvaged everything I had from my freshwater tank in storage and hurried off to the hardware store for some plumbing.
I started with pvc standpipes and no overflow boxes. I slipped a piece of abs over the pipes to hide the white and was on to the next project. I realized after filling it that straight pipes were loud so I ended up adding durso standpipes. Still no overflow boxes. If I had it to do all over, I would add the overflows but after 100lbs of sand, 120lbs of LR, they will have to wait till the next build.
As I mentioned I placed just over 100lbs of sand, and 120-125lbs of LR. I used 40 to 50 pounds of silica play sand that I had at the house as the base, and 50 to 60 pounds of Aragonite that I got from the LFS where I also got my rock. I have read all about the woes of silica, but I have also read that many use it trouble free and I figured I would take the risk. You will realize that I tend to learn as I go. I also added about 25 lbs of black aquarium gravel in the back of the tank, as a small border around the sand, because I like the way it looks. The LR was a combination of about 75 pounds of base rock, and 50 pounds of LR that came out of a reef DT in a LFS that was going out of business. Included in the base rock was a few pieces of the red, fake, lava rock you can buy at the LFS, simply because I had it left over from a freshwater build, and I love the way it looks.
I knew I wanted to do a sump and fuge but I wasn't sure exactly how I was going to tackle the project. By this time I found LivingReefs. I read a lot of posts on the subject, felt inspired and I was off, once again to the hardware store. (They know me by name now) I arrived home with a 15 gallon rubbermaid tub, a 10 gallon glass tank, some acrylic, some plumbing, and a whole lot of enthusiasm. My basic design was to install my skimmer, filtration, and return within the rubbermaid and then overflow into the 10 gal glass for my fuge with a second, smaller return. I built it, tinkered with it, and was pleased for about two weeks until my second flood...
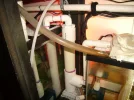
Once again, I was off to the hardware store and the LFS. The first design wasn't bad, but I was trying to maximize the water volume of these two relatively small tanks, and was trying to cram too much into them. I knew I could do better. I arrived back with a 20 gal tall glass tank and some new plumbing, and as always, a ton of enthusiasm. I planned to drill the 20 gal but after looking into some more I decided not to and instead I designed an overflow system that works great. It is all out of PVC. I placed two sections of 2" pvc next to each other. One inside the 20 gal, one outside. They are both capped on the bottom to form a container. The one inside the 20 gal is cut to the height I want my water level. The one outside the tank is taller. Then, I took 3/4" PVC and two 90* elbows and formed a "U" that I turned upside down and inserted into both of 2" containers I made. I placed a piece of airline tubing into the 3/4" "U" long enough that its' end sits right in the middle of the "U" section. This is used to start a siphon. The last part of the design was to place a reducing "T" at the bottom of the 2" container outside of the 20 gal tank. I connected 3/4" PVC and a 90* elbow to it and ran plumbing up and over the side of the 10 gal tank. The whole system was really simple and works great. I can flow as much as 450 gph and it's flood proof. The basic concept works like this. You fill both of the 2" containers with water to prime them, then use a powerhead to start the syphon with the airline by removing the air within the 3/4" "U". After doing this, the water level between the two 2" containers will always be equal to each other. The 3/4" plumbing into my fuge just has to sit below the height of the water line in the 2" containers and voila, you have a simple gravity feed overflow. See the attached pics.
I use a 500 gph pump in the fuge, feeding into the DT and T'd into the sump. Both have ball valves for flow control. I use a 700 gph pump as my main return pump in the sump. I also have 3 MJ 1200's in the DT for additional flow. I estimate that I have somewhere in the neighborhood of 1500 gph in the DT and 800 gph turnover.
I have an Aquaclear HOB filter in the sump for carbon/bio filtration that I can use as I need, and I use a modified seaclone skimmer. I plan to upgrade my skimmer before I increase my bioload substantially, however after tinkering with the seaclone a bit it seems to be doing rather well. I have to empty the cup twice a week to keep up with the skimmate it's producing. I just shortened the inner tube a bit, and added a better air control valve to it. The only hard part about getting it to skim well is figuring out exactly how much air to feed it. I think these skimmers get a bad rep because people allow to much air through them and consequently they produce little to no skimmate. After spending a long time adjusting and monitoring it I have discovered that with a small amount of air, the thing starts foaming like a foam monster!
For lighting, I have 4 T5 HO lighting fixtures with 2 24k, and 2 10k bulbs. (I think-there may be 18k's somewhere in the mix-I dont remember). I also added LED's for my Lunars and I use a 10kPC flourescent on my fuge.
I am currently stocked with about 35 hermits, 40 snails (turbo, astrea, margarita, and nasarius), 2 emeralds, and 2 peppermint shrimp. I also plan to add a serpent star, brittle star, abalone, tuxedo urchin, and some clams to my CUC, but slow and steady wins the race.
The biggest mistake I made before arriving here at LivingReefs, was using de-chlorinated tap water to start my tank. I quickly learned the process of water changes and the value of good water.
At this point I have been up and running a little more than two months, and my tank seems very stable. My CUC has the algae well under control. My parameters are steady at 0/0/0 and I also can/do test for phosphates, PH, KO, calcium, and magnesium as needed. (currently just PH til I start adding corals). I keep it at 79/80 with very little fluctaution. I do 10% water changes weekly.
I love this hobby and I am so glad that I found Living Reefs. There is no way I would be off to such a great start if I had continued relying on the advice I was getting at the LFS. THANKS!
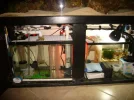
Full shot of sump and fuge:
Overflow system
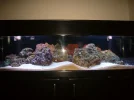
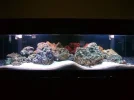
a couple of full tank shots
I started with a 75 gal drilled acrylic tank and stand/canopy that I wrestled away from a freshwater guy here in town. He was moving and needed it gone. I told him I was going to build a salt reef and he replied this tank will never work for that....
I got the tank and stand home, salvaged everything I had from my freshwater tank in storage and hurried off to the hardware store for some plumbing.
I started with pvc standpipes and no overflow boxes. I slipped a piece of abs over the pipes to hide the white and was on to the next project. I realized after filling it that straight pipes were loud so I ended up adding durso standpipes. Still no overflow boxes. If I had it to do all over, I would add the overflows but after 100lbs of sand, 120lbs of LR, they will have to wait till the next build.
As I mentioned I placed just over 100lbs of sand, and 120-125lbs of LR. I used 40 to 50 pounds of silica play sand that I had at the house as the base, and 50 to 60 pounds of Aragonite that I got from the LFS where I also got my rock. I have read all about the woes of silica, but I have also read that many use it trouble free and I figured I would take the risk. You will realize that I tend to learn as I go. I also added about 25 lbs of black aquarium gravel in the back of the tank, as a small border around the sand, because I like the way it looks. The LR was a combination of about 75 pounds of base rock, and 50 pounds of LR that came out of a reef DT in a LFS that was going out of business. Included in the base rock was a few pieces of the red, fake, lava rock you can buy at the LFS, simply because I had it left over from a freshwater build, and I love the way it looks.
I knew I wanted to do a sump and fuge but I wasn't sure exactly how I was going to tackle the project. By this time I found LivingReefs. I read a lot of posts on the subject, felt inspired and I was off, once again to the hardware store. (They know me by name now) I arrived home with a 15 gallon rubbermaid tub, a 10 gallon glass tank, some acrylic, some plumbing, and a whole lot of enthusiasm. My basic design was to install my skimmer, filtration, and return within the rubbermaid and then overflow into the 10 gal glass for my fuge with a second, smaller return. I built it, tinkered with it, and was pleased for about two weeks until my second flood...
Once again, I was off to the hardware store and the LFS. The first design wasn't bad, but I was trying to maximize the water volume of these two relatively small tanks, and was trying to cram too much into them. I knew I could do better. I arrived back with a 20 gal tall glass tank and some new plumbing, and as always, a ton of enthusiasm. I planned to drill the 20 gal but after looking into some more I decided not to and instead I designed an overflow system that works great. It is all out of PVC. I placed two sections of 2" pvc next to each other. One inside the 20 gal, one outside. They are both capped on the bottom to form a container. The one inside the 20 gal is cut to the height I want my water level. The one outside the tank is taller. Then, I took 3/4" PVC and two 90* elbows and formed a "U" that I turned upside down and inserted into both of 2" containers I made. I placed a piece of airline tubing into the 3/4" "U" long enough that its' end sits right in the middle of the "U" section. This is used to start a siphon. The last part of the design was to place a reducing "T" at the bottom of the 2" container outside of the 20 gal tank. I connected 3/4" PVC and a 90* elbow to it and ran plumbing up and over the side of the 10 gal tank. The whole system was really simple and works great. I can flow as much as 450 gph and it's flood proof. The basic concept works like this. You fill both of the 2" containers with water to prime them, then use a powerhead to start the syphon with the airline by removing the air within the 3/4" "U". After doing this, the water level between the two 2" containers will always be equal to each other. The 3/4" plumbing into my fuge just has to sit below the height of the water line in the 2" containers and voila, you have a simple gravity feed overflow. See the attached pics.
I use a 500 gph pump in the fuge, feeding into the DT and T'd into the sump. Both have ball valves for flow control. I use a 700 gph pump as my main return pump in the sump. I also have 3 MJ 1200's in the DT for additional flow. I estimate that I have somewhere in the neighborhood of 1500 gph in the DT and 800 gph turnover.
I have an Aquaclear HOB filter in the sump for carbon/bio filtration that I can use as I need, and I use a modified seaclone skimmer. I plan to upgrade my skimmer before I increase my bioload substantially, however after tinkering with the seaclone a bit it seems to be doing rather well. I have to empty the cup twice a week to keep up with the skimmate it's producing. I just shortened the inner tube a bit, and added a better air control valve to it. The only hard part about getting it to skim well is figuring out exactly how much air to feed it. I think these skimmers get a bad rep because people allow to much air through them and consequently they produce little to no skimmate. After spending a long time adjusting and monitoring it I have discovered that with a small amount of air, the thing starts foaming like a foam monster!
For lighting, I have 4 T5 HO lighting fixtures with 2 24k, and 2 10k bulbs. (I think-there may be 18k's somewhere in the mix-I dont remember). I also added LED's for my Lunars and I use a 10kPC flourescent on my fuge.
I am currently stocked with about 35 hermits, 40 snails (turbo, astrea, margarita, and nasarius), 2 emeralds, and 2 peppermint shrimp. I also plan to add a serpent star, brittle star, abalone, tuxedo urchin, and some clams to my CUC, but slow and steady wins the race.
The biggest mistake I made before arriving here at LivingReefs, was using de-chlorinated tap water to start my tank. I quickly learned the process of water changes and the value of good water.
At this point I have been up and running a little more than two months, and my tank seems very stable. My CUC has the algae well under control. My parameters are steady at 0/0/0 and I also can/do test for phosphates, PH, KO, calcium, and magnesium as needed. (currently just PH til I start adding corals). I keep it at 79/80 with very little fluctaution. I do 10% water changes weekly.
I love this hobby and I am so glad that I found Living Reefs. There is no way I would be off to such a great start if I had continued relying on the advice I was getting at the LFS. THANKS!
Full shot of sump and fuge:

Overflow system

a couple of full tank shots


